Subscribe For Free Updates!

သိသေလာက္ တတ္သေလာက္ေလးမ်ားကို ျပန္လည္မွ်ေဝျခင္း

Sunday, September 28, 2014

Viber For Windows & Myanmar Font


ကဲ့မိတ္ဆက္ေပးလုိက္ပါျပီေနာ္ Viber ကို Windows 7 မွာျမန္မာစာ မွန္ျပီး Windows 8 မွာျမန္မာစာ မေပၚဘူးဆုိျပီး ေအာ္ေနၾကတဲ့ မိတ္ေဆြ သူငယ္ခ်င္း ေဘာ္ဒါမ်ားအတြက္ပါ ကၽြန္ေတာ္လည္း တင္မယ္ တင္မယ္နဲ႔ မတင္ျဖစ္ပါဘူး အခုေတာ့ တင္ေပးလုိက္ပါျပီ ဒါေလးကိုသာေဆာင္ထားလိုက္ပါ Windows 8 မွာေရာ႔ ျမန္မာစာကို ေကာင္းေကာင္းျမင္ရပါတယ္ မိမိတို႔ရဲ႕ ကြန္ပ်ဴတာမွာ Viber ရိွေနတယ္ဆုိရင္ေတာ့ မိမိတုိ႔ ကြန္ပ်ဴတာမွာ ရိွတဲ့ Viber ကို Unstill လုပ္လုိက္ပါ ျပီးရင္ ေအာက္မွာေပးထားတဲ့ Kayin2014 font ေလးကိုေဒါင္းယူျပီး Instill လုပ္ပါ တကယ္လုိ႔ Windows XP ဆိုပါက Windows + R တြဲႏွိပ္ပါ ေပၚလာတဲ့ Box မွာ fonts လုိ႔ရိုက္ထည့္ျပီး Enter ေခါက္လုိက္ပါ ထပ္ေပၚလာတဲ့ Box မွာ Kayin2014 Font ေလးကို Copy ယူျပီး ထည့္ေပးလုိက္ပါ တကယ္လုိ႔ Install လုပ္မယ္ဆုိပါက ေအာက္ကပံုေလးအတုိင္း


 အေပၚက Kayin2014 Font ေလးကို ဒီမွာယူပါ==>> DOWNLOAD


Viber Software ကိုေဒါင္းယူခ်င္တယ္ဆိုရင္ေတာ့ ေအာက္မွာေဒါင္းယူပါ

                                                        ဒီမွာယူပါ==>> DOWNLOAD


Monday, September 22, 2014

RAR Password Unlocker & Keygen (Full Version)


မဂၤလာပါ ဒါေလးကေတာ့ RAR Zip ဖုိင္ေတြရဲ႕ Password ကို 100% ရွာေပးႏိူင္ပါတယ္ မိမိတုိ႔ သိမ္းဆည္းထားတဲ့ RAR Zip ဖိုင္ေတြ Password မမွတ္မိေတာ့လုိ႔ပဲျဖစ္ျဖစ္ တျခား Password ေပးထားတဲ့ ႏိူင္ငံျခား ဆိုဒ္ေတြက RAR ဖိုင္ေလးေတြကို ေဒါင္းမိလုိ႔ပဲျဖစ္ျဖစ္ အေၾကာင္းအမ်ဳိးမ်ဳိးေၾကာင့္ RAR Password မသိခဲ့ပါက ဒါေလးကိုေဆာင္ထားလုိက္ပါ 100% ရွာေပးႏူိင္ပါတယ္ ဖုိင္ဆိုဒ္ကလည္း ေသးေသးေလးပါ 3.07MB ေလးသာရိွပါတယ္ Full ျဖစ္ေစဖုိ႔အတြက္ကေတာ့ Keygen ေရာ႔ထည့္ေပးထားပါတယ္ Key ထည့္နည္းနဲ႔ အသံုးျပဳနည္းေလး မတတ္ပါက ေအာက္မွာ Video ဖုိင္ေလးနဲ႔ အစအဆံုးလုပ္ျပထားပါတယ္ သိတဲ့သူေတြကေတာ့ေက်ာ္သြားလုိက္ပါ လံုးဝ မသိမတတ္ေသးေသာ သူမ်ားအတြက္ Video ဖုိင္ေလးနဲ႔ လုပ္ျပထားပါတယ္ အသံုးျပဳေဆာင္ထားခ်င္တယ္ဆိုရင္ေတာ့ ေအာက္မွာေဒါင္းယူလုိက္ပါ


                                                              ဒီမွာယူပါ==>> DOWNLOAD


Windows 8.1 Pro (32bit/64bit ISO) Full Version


မဂၤလာပါ ဒါေလးကေတာ့ လက္ရိွ ကၽြန္ေတာ္သံုးေနတဲ့ Windows 8.1 Pro ေလးပဲျဖစ္ပါတယ္ အသံုးျပဳခ်င္သူမ်ားအဆင္ေျပေအာင္လုိ႔ ျပန္လည္မွ်ေဝေပးလုိက္ပါတယ္ ဒါေလးကေတာ့ Key မေတာင္းပါဘူး Windows 8.1 ကိုေတာင္းတေနၾကတဲ့ ညီအကိုေမာင္ႏွမ သူငယ္ခ်င္း ေဘာ္ဒါမ်ားအတြက္ပါ activation ေလးကုိပါ ေအာက္မွာတင္ေပးထားပါတယ္ အခုပို႔စ္မွာ တင္ေပးလုိက္တဲ့ activation ေလးကေတာ့ Windows 8 အမ်ဳိးမ်ဳိး နဲ႔ Windows 8.1 အမ်ဳိးမ်ဳိးေတြမွာ activation လုပ္ေပးရံုမကပဲ Microsoft Office 2010 နဲ႔ Microsoft Office 2013 အစရိွတာေတြကိုပါ activation လုပ္ေပးႏိူင္ပါတယ္ Windows 8.1 Pro ေလးကို အသံုးျပဳေဆာင္ထားခ်င္တယ္ဆုိရင္ေတာ့ အေသးစိတ္ကို မူရင္းအတုိင္း ေအာက္မွာေလ့လာ ေဒါင္းယူပါ......

                                             ဒီမွာယူပါ==>> All Windows 8.1 activated
activation
activation


Windows operating system family is very closer to every one who used Personal computers. After success of windows 7  Microsoft looking forward to introduce new user experience to their loyal customers. New Windows 8.1 bring new interface that is more focused on  mobility features with tile interfaces.Here you can download windows 8.1 download iso full version (Final Edition 32bit/64bit ISO) Free Dowload
Windows 8.1 comprised with four different editions
  1. Windows 8.1
  2. Windows 8.1 Pro
  3. Windows 8.1 Enterprise
  4. Windows 8.1 RT
Each edition of the windows 8 bring different feature and advantages.
From wikipedia
Windows 8 pro :”Windows 8 Pro is comparable to Windows 7 Professional and Ultimate[4][5] and is targeted towards enthusiasts and business users; it includes all the features of Windows 8. Additional features include the ability to receive Remote Desktop connections, the ability to participate in a Windows Server domainEncrypting File SystemHyper-V, and Virtual Hard Disk Booting, Group Policy as well as BitLocker and BitLocker To Go. Windows Media Center functionality is available only for Windows 8 Pro as a separate software package.[6]
Now you can download and test the windows 8 pro version free and after you comfort with new operating system you can buy original licence key from Microsoft. We highly recommend buy useoriginal version of the software’s and  that will led to encourage developers who are make innovative ideas and product to make our task easy.
Windows 8 pro Key
Following version of windows 8.1 ISO dows not required any installation key or activation key during the installation and after installation. Activation depending on the your current windows 8 activation. If You have windows 7 or lower version please install Windows 8 Pro version before installing windows 8.1 Pro version.
Here we only provide installation key for install full version of the windows 8 pro.  After installation windows you can used windows as you wish. Some of the personalizing option disable until you buy original activation key from Microsoft.
Ultimate idea of this post is to give knowledge about latest software environment to users who have less familiar with latest updates.
ေအာက္ကလင့္ေတြကို Internet Download Manager ထဲကို ေကာ္ပီယူျပီး ထည့္ေပးလိုက္ပါ


Download Links
  • 32 bit Windows 8 pro:   http://85.25.43.29/Getintopc.com/en_windows_8_1_pro_vl_x86_dvd_2972633.iso
  • 64 bit Windows 8 pro:  http://85.25.43.29/Getintopc.com/en_windows_8_1_pro_vl_x64_dvd_2971948.iso

Please copy this link and download using “internet download manager” for fast download


Saturday, September 20, 2014

CursorFX Themes (Free Download)


မိမိတုိ႔ရဲ႕ PC ေပၚမွာ ေမာက္ကို ပံုစံဒီဇိုင္း အဆန္းေလးေတြနဲ႔ ေျပာင္းသံုးမယ္ အျမဲသံုးေနၾက ေမာက္ပံုစံေလးကို ရိုးေနျပီးဆုိျပီး ေနာက္ထပ္ ေမာက္ပံုစံ အသစ္အဆန္းေလးေတြနဲ႔ ေျပာင္းသံုးခ်င္တယ္ဆိုရင္ေတာ့ 14.1MB ေလးသာရိွတဲ့ ဒီအေကာင္ေလးကိုေဆာင္ထားလုိက္ပါ ေဒါင္းလို႔ရလာတဲ့ ဖုိင္ေလးကိုျဖည္ျပီး Run ေပးလုိက္ရံုေလးပါပဲ ျပီးရင္ မိမိႏွစ္သက္ရာ ပံုေလးကို Click ႏွိပ္ျပီး အသံုးျပဳႏိူင္ပါတယ္ Windows တုိင္းနဲ႔ ကိုက္ညီမႈရိွျပီး Windows 8.1 အထိအသံုးျပဳႏိူင္ပါတယ္ အသံုးျပဳေဆာင္ထားခ်င္တယ္ဆုိရင္ေတာ့ ေအာက္မွာေဒါင္းယူလုိက္ပါ

                                                         ဒီမွာယူပါ==>> DOWNLOAD


Start Menu Reviver 2.0 (Free Download)


ဒါေလးကေတာ့ Windows 9 Style Start Menu ေလးပါ Windows 8 နဲ႔ Windows 8.1 သံုးေနၾကတဲ့ မိတ္ေဆြ ေဘာ္ဒါမ်ားအတြက္ ဒီ Windows 9 Start Menu ေလးကိုမိတ္ဆက္ေပးလုိက္ပါတယ္ တကယ္လုိ႔မ်ား Windows 7 အသံုးျပဳသူေတြပါ ဘေဘာၾကရင္ ဒါေလးကိုေဒါင္းေလာ့ လုပ္ျပီး Install လုပ္ေပးလုိက္တာနဲ႔ Windows 9 Start Menu ေလးကိုေတြ႔ျမင္ရမွာျဖစ္ပါတယ္ ဒီ Windows 9 Start Menu ေလးက ေသသပ္မႈရိွျပီး Icon ေတြကို မိမိစိတ္ၾကိဳက္ ေျပာင္းထည့္ထားႏိူင္ပါတယ္ Windows 8 စသံုးတဲ့သူေတြ Start Menu မပါလို႔ ေနသားမက် သံုးရတာ အဆင္မေျပသူေတြ ဒါေလးကိုေဆာင္ထားလုိက္ပါ ဒီဇိုင္းကေတာ့ အရမ္းလန္းပါတယ္ Windows 8.1 မွာ Start Menu ပါလာေပေမ့ Right + Click ႏွိပ္ျပီး သံုးရတာ သိပ္အဆင္မေျပဘူးလုိ႔ထင္ေနရင္ေတာ့ ဒီ Windows 9 Style Start Menu ေလးကိုထည့္သံုးၾကည့္လုိက္ပါ စိတ္ၾကိဳက္ေတြ႔ေစရပါမယ္ Shutdown , Restart , Sleep , Lock ေတြကိုလည္း Windows 7 မွာသံုးေနၾကတဲ့ ပံုစံအတုိင္း သံုးစြဲသူေတြ လြယ္ကူစြာ အသံုးျပဳႏိူင္ေအာင္ တြဲထည့္ေပးထားပါတယ္ Icon ေတြကို မိမိစိတ္ၾကိဳက္ေျပာင္းထည့္ခ်င္တယ္ဆုိရင္ေတာ့ ပံုမွာပါတဲ့အထဲက အေပါင္း လကၡဏာ ပါတဲ့ေနရာေတြမွာ Right+Click ႏွိပ္ျပီး Add tile ေနရာကေန မိမိစိတ္ၾကိဳက္ထည့္ေပးႏိူင္ပါတယ္ Windows 9 Style Start Menu ဒီဇိုင္းေလးကို အသံုးျပဳေဆာင္ထားခ်င္တယ္ဆုိရင္ေတာ့ ေအာက္မွာေဒါင္းယူလုိက္ပါ

                                                           ဒီမွာယူပါ==>> DOWNLOAD


Win RAR 5.00 Beta7 & Keygen (Full Version)


မဂၤလာပါ ဒါေလးကေတာ့ ကြန္ပ်ဴတာတိုင္းမွာ မရိွမျဖစ္လုိအပ္တဲ့ Win RAR ေလးပါပဲ ကြန္ပ်ဴတာသံုးသူတိုင္း ဖုိင္ခြဲ ဖုိင္ခ်ဳံတာေတြမွာ အသံုးျပဳၾကတဲ့ Win RAR ေလးပဲျဖစ္ပါတယ္ 7-Zip နဲ႔ Win RAR ကိုယွဥ္ၾကည့္လုိက္ရင္ Win RAR ဟာလူသံုးမ်ားတာကိုေတြ႔ရပါတယ္ ဘာလုိ႔လည္းဆုိေတာ့သူက ပိုျပီးရိုးရွင္းလြယ္ကူျမန္ဆန္လို႔ပါပဲ Win RAR 5.00 Beta 7 ေလးကိုေတာ့ Zip ဖိုင္အျဖစ္တင္ေပးထားပါတယ္ တကယ္လုိ႔ မိမိ အသံုးျပဳေနတဲ့ ကြန္ပ်ဴတာဟာ Zip ဖိုင္ျဖည္ဖို႔အတြက္ Win RAR သုိ႔မဟုတ္ 7-Zip မရိွေသးဘူးဆုိရင္ေတာ့ 7-Zip 32 bit ကို ဒီမွာ ေဒါင္းယူႏိူင္ပါတယ္ 7-Zip 64 bit ကိုေတာ့ ဒီမွာ ေဒါင္းယူႏူိင္ပါတယ္ Win RAR Keygen ထည့္နည္းေလး မသိပါက ေအာက္မွာ Video ဖုိင္ေလးကို ၾကည့္ျပီးလုပ္ေပးလုိက္ပါ အသံုးျပဳေဆာင္ထားခ်င္တယ္ဆုိရင္ေတာ့ ေအာက္မွာေဒါင္းယူလုိက္ပါ.......

                                                                     ဒီမွာယူပါ==>> DOWNLOAD


Mozilla Firefox 33.0 Beta 5 (Free Download)


ကြန္ပ်ဴတာကိုင္ေဆာင္သူတုိင္းနဲ႔ အင္တာနဲ႔သံုးသူတိုင္း Mozilla Firefox ဆုိရင္ မသိတဲ့သူမရိွပါဘူးေနာ္ အဲဒါေၾကာင့္ ဘာမွကိုေျပာစရာမလုိေတာ့ဘူးထင္ပါတယ္ Update အသစ္ထြက္လာလုိ႔ Mozilla Firefox 33.0 Beta 5 ေလးကို ျပန္လည္မွ်ေဝေပးလုိက္ ေနာက္ဆံုးထြက္ Update ေလးကိုမွ သံုးခ်င္တယ္ဆုိရင္ေတာ့ ေအာက္မွာေဒါင္းယူလုိက္ပါ

  • Latest Version: Firefox 33.0 Beta 5
  • Requirements: Windows 2000 / XP / Vista / Windows 7 / XP64 / Vista64 / Windows 7 64 / Windows 8 / Windows 8 64
                                                                  ဒီမွာယူပါ==>> DOWNLOAD


Friday, September 19, 2014

Windows XP Professional SP3 (Eng/x86) + Sata Driver With Keys Full Version


မဂၤလာပါ ဒါေလးကေတာ့ XP ခ်စ္ပရိတ္သတ္ေတြအတြက္ပါ Windows XP Professional SP3 အသစ္ထြက္လာတာေတြ႔လို႔ XP ပရိတ္သတ္ေတြအတြက္ လုိအပ္တဲ့သူေတြ အဆင္ေျပေအာင္လုိ႔ ႏိူင္ငံျခား ဆုိဒ္တစ္ခုကေန ျပန္လည္ ကူးယူ ရွယ္ေပးလုိက္ပါတယ္ Microsoft ကေန Update အသစ္ထုတ္လုပ္ေပးလုိက္တဲ့ 14,08,2014 ေန႔ကထြက္ရိွလာတဲ့ Update Windows ေလးျဖစ္ပါတယ္ ဖိုင္ဆုိဒ္ကေတာ့ 624MB ရိွပါတယ္ အသံုးျပဳေဆာင္ထားခ်င္တယ္ဆုိရင္ေတာ့ အေသးစိတ္ကို ေအာက္မွာေလ့လာ ေဒါင္းယူပါ


Windows XP Professional SP3 (Eng/x86/Aug2014) + Sata Driver With Keys Full Version Free Download

This is the original Windows XP Professional SP3 (32-bit) ISO from Microsoft Updated August 2014. Including Microsoft updates until 14.08.2014, Internet Explorer 8, Adobe Flash Player 13 and SATA drivers.
- Declaration: Some might say that Microsoft no longer supports Windows XP. Well, that true! Then
whats new in May release? Here you go:
Added: Security Update for Internet Explorer 8 for Windows XP (KB2964358). Released: 01.06.2014
Updated: Windows Malicious Software Removal Tool – June 2014 (KB890830). Released: 13.06.2014
Updated: Adobe Flash Player ActiveX Control (13.0.0.214). Released: 13.08.2014
NO tweaks or add-ons.
NO additional programs and software added.
NO graphics, scripts and wallpapers added or changed.
NO serial needed during installation, the key is already inserted.
Activated and passes Microsoft Windows Genuine validation test.
Its the original image from Microsoft except added updates, IE8, Adobe Flash Player (13.0.0.214) and SATA drivers!
Windows Messenger, MSN Explorer and Internet Explorer 6 were removed.
System requirements:
Pentium 233-megahertz (MHz) processor or faster (300 MHz is recommended).
At least 64 megabytes (MB) of RAM (128 MB is recommended).
At least 1.5 gigabytes (GB) of available space on the hard disk .
Video adapter and monitor with Super VGA (800 x 600) or higher resolution.

valid Key :
V2C47-MK7JD-3R89F-D2KXW-VPK3J
D6FY9-288V2-QHKC8-WW9DY-YCKJJ
CCFRD-B49C2-XC9JV-49DW9-MKTHQ
BDV7T-3JK2Y-BT4RM-3GHH2-6QHDY
BTFRC-GHC7V-2WFBW-Y42XW-9WDKY
JG28K-H9Q7X-BH6W4-3PDCQ-6XBFJ
YCKQV-CK63Y-2P3VG-8FTB6-T7W28
CD87T-HFP4C-V7X7H-8VY68-W7D7M
CB9YB-Q73J8-RKPMH-M2WFT-P4WQJ
XR6BX-WB4J4-V8D4D-PT7KY-X6QWY
KH6RH-6374K-8CPDJ-CJ3CV-QQC2Q
FRH2X-6VD7F-YH2TV-2V8B7-J46FG
QKBGY-T8JFG-F448Q-24KRG-48XPJ
H49F9-8RTVG-MTCVH-G2MFK-C47C8
KW88P-MG360-WMYJJ-9Q2G8-F3MWB
RJFWT-PD7GJ-8QV7B-PGWRC-9Q34Q
BW2DK-62W43-74CDC-6284C-32GPY
WQC9V-4T9JK-B8FG9-QWJ2C-KXY43
CJ4BR-YHR9H-XPJB4-J4VWY-39XYW
J22J6-TJM8G-RBH6D-CRP46-Y6Q7W
XWTC3-Y8G6Y-YH7X8-D673M-WFBDX
PD9WR-BDGBK-RPXKR-W3CK4-QHYF3
D6FY9-288V2-QHKC8-WW9DY-YCKJJ
CCFRD-B49C2-XC9JV-49DW9-MKTHQ
BDV7T-3JK2Y-BT4RM-3GHH2-6QHDY

                                                           ဒီမွာယူပါ==>> DOWNLOAD


Monday, September 15, 2014

CleanMyPC Registry Cleaner v4.45 & Keygen


CleanMyPC Registry Cleaner ဒါေလးကေတာ့ ပံုၾကည့္လိုက္တာနဲ႔ ဘာအတြက္လဲ ဘာလုပ္တာလည္းဆုိတာကိုေတာ့ လူတုိင္းသိပါလိမ့္မယ္ေနာ္ မိမိတုိ႔ရဲ႕ ကြန္ပ်ဴတာ အရမ္းေလးလံ ေႏွးေကြးေနပါသလား CleanMyPC Registry Cleaner ေလးကိုေဆာင္ထားလုိက္ပါ လုပ္ေဆာင္ခ်က္ေတြလည္း ေတာ္ေတာ္ေလးကို ျပည့္စံုပါတယ္ သူကေတာ့ မိမိတုိ႔ မေတြ႔မျမင္ႏိူင္တဲ့ Windows တစ္ခုလံုး ရဲ႕အမွား ျပႆနာ အမ်ဳိးမ်ဳိးတုိ႔ကို သူကျပဳျပင္ သန္႔ရွင္းေပးပါလိမ့္မယ္ ဒါဆိုရင္ေတာ့ မိမိတုိ႔ရဲ႕ ကြန္ပ်ဴတာဟာ သြက္လက္ျမန္ဆန္ျပီး အသံုးျပဳရ အဆင္ေျပပါလိမ့္မယ္ Full ျဖစ္ေစဖုိ႔အတြက္ Keygen ေရာ႔ထည့္ေပးထားပါတယ္ Keygen ထည့္နည္းမသိပါက အေသးစိတ္ကို ေအာက္မွာေလ့လာ ေဒါင္းယူပါ.......

Keygen ထည့္နည္း
(1) Install လုပ္ျပီးတာနဲ႔  CleanMyPC Registry Cleaner ေလးကို ဖြင့္လုိက္ပါ
(2) Product Information မွာႏွိပ္ပါ
(3) About The Product ျပီးေတာ့ Enter Registration Info... မွာႏွိပ္လိုက္ပါ
(4) ေပၚလာတဲ့ Box မွာ Keygen ထဲက Name နဲ႔ Serial Code ေလးေတြကို Copy ယူျပီးထည့္ေပးလုိက္ပါ ျပီးေတာ့ OK ေပါ့ ဒါဆိုရင္ Full အျဖစ္အျမဲ အသံုးျပဳလုိ႔ရပါျပီ


                                                          ဒီမွာယူပါ==>> DOWNLOAD


Sunday, September 14, 2014

Format Factory 3.3.5.0 Free Download

Format Factory Version အသစ္ထြက္လာတာေတြ႔လုိ႔ ေနာက္ဆံုးထြက္ Version ေလးနဲ႔ျပန္လည္ျပီးမိတ္ဆက္ေပးလုိက္ပါတယ္ Update Version ကိုမွ သံုးခ်င္ၾကတဲ့ သူငယ္ခ်င္း မိတ္ေဆြ ေဘာ္ဒါမ်ားအတြက္ တင္ေပးလုိက္ပါတယ္ Format ေျပာင္းတဲ့ေနရာမွာေတာ့ တကယ္ကို အစြမ္းထက္တဲ့ Software ေလးတစ္ခုပါ ဘာသာ စကား 62 မ်ဳိးပါရိွျပီး Windows 8 ေတြမွာဆုိ ျမန္မာ ဘာသာစကားကို မွန္ကန္စြာေတြ႔ျမင္ရပါတယ္ စက္တုိင္းနဲ႔လည္း ကိုက္ညီမႈရိွပါတယ္ အသံုးျပဳ ေဆာင္ထားခ်င္တယ္ဆုိရင္ေတာ့ ေအာက္မွာေဒါင္းယူလိုက္ပါ.........


                                                        ဒီမွာယူပါ==>>DOWNLOAD

Format Factory is a multifunctional media converter.
Provides functions below:
All to MP4/3GP/MPG/AVI/WMV/FLV/SWF.All to MP3/WMA/AMR/OGG/AAC/WAV.All to JPG/BMP/PNG/TIF/ICO/GIF/TGA.Rip DVD to video file , Rip Music CD to audio file. 
MP4 files support iPod/iPhone/PSP/BlackBerry format.
Supports RMVB,Watermark, AV Mux.
Format Factory's Feature:
1 support converting all popular video,audio,picture formats to others.
2 Repair damaged video and audio file.
3 Reducing Multimedia file size.
4 Support iphone,ipod multimedia file formats.
5 Picture converting supports Zoom,Rotate/Flip,tags.
6 DVD Ripper.
7 Supports 62 languages
OS requirements: All Windows OS


Blogger Template ထည့္နည္း


မဂၤလာပါ Blogger ပိုင္ရွင္သစ္ေလးမ်ားအတြက္ Template ထည့္နည္းေလးကို မိတ္ဆက္ေပးလိုက္ပါတယ္ တကယ္ဆုိရင္ေတာ့ တစ္ဆင့္ခ်င္းစီကို ပံုေတြနဲ႔ ရွင္းျပျပီးတင္ခ်င္ခဲ့တာပါ အခုေတာ့ Video ဖိုင္ေလးနဲ႔ပဲ တင္ေပးလုိက္ပါတယ္ စာအမ်ားၾကီး မေရးေတာ့ပါဘူး လုိရင္းတုိရွင္းပဲ ေရးပါေတာ့မယ္ မရွင္းရင္ေတာ့ ေအာက္က Video ဖုိင္ေလးကုိပါၾကည့္ပါ တစ္ဆင့္ခ်င္းစီ ပံုနဲ႔ မတင္ျဖစ္တာေတာ့ေဆာရီးပါေနာ္ ေအာက္က Video ဖိုင္ေလးအတုိင္းပဲ သြားၾကရေအာင္ေနာ္....

(၁) Blogger Logn in ဝင္လုိက္ပါ

(၂) Free Template တစ္ခုကို Download လုပ္ပါ Download မလုပ္ေသးခင္ Template ပံုစံကိုၾကည့္မယ္ဆုိရင္ Demo ဆိုတဲ့ေနရာမွာ ႏွိပ္ျပီး Template ပံုစံကိုၾကည့္ႏူိင္ပါတယ္ မိမိ သံုးခ်င္တဲ့ ပံုစံအတုိင္း စိတ္ၾကိဳက္ေတြ႔ျပီဆုိရင္ေတာ့ Download မွာႏွိပ္ျပီး ေဒါင္းယူလုိက္ပါ

(၃) ေဒါင္းလုိ႔ရလာတဲ့ Template ဖုိင္ေလးကို Copy လုပ္ျပီး Folder အသစ္တစ္ခုမွာထည့္ျပီး ဖုိင္ျဖည္လုိက္ပါ............

(၄) မိမိ Blog ရဲ႕ Template ဆုိတဲ့ေနရာကို သြားပါ

(၅) Backup / Restore ဆုိတဲ့ေနရာမွာႏွိပ္ပါ

(၆) တကယ္လုိ႔ Template အေဟာင္းကို ျပန္သိမ္းထားခ်င္တယ္ဆုိပါက Download full template မွာႏွိပ္ျပီး ေဒါင္းယူသိမ္းထားႏူိင္ပါတယ္ နံပါတ္ ၂ အဆင့္မွာ မိမိေဒါင္းထားတဲ့ Template ကို္ထည့္မယ္ဆိုရင္ေတာ့ Browse မွာႏွိပ္ပါ ျပီးရင္အဆင့္ ၃ မွာဖိုင္ျဖည္ထားတဲ့ Template ကိုထည့္လုိက္ပါ ျပီးရင္ Upload မွာႏွိပ္ျပီး ခဏေစာင့္လုိက္ပါ ျပီးသြားတာနဲ႔ View Blog မွာႏွိပ္ျပီး မိမိတုိ႔ Blog ကိုဝင္ၾကည့္လုိက္တာနဲ႔ မိမိေဒါင္းယူလာတဲ့ Template ပံုစံမ်ဳိး ျဖစ္သြားတာကိုေတြ႔ျမင္ရပါလိမ့္မယ္...

မရွင္းေသးရင္ေတာ့ Video ဖိုင္ေလးကို ထပ္ၾကည့္ပါ ေပ်ာ္ရႊင္စရာ ေန႔ေလး တေန႔ျဖစ္ပါေစ


Saturday, September 13, 2014

Powered by Blogger ဖ်က္နည္း


ဒါေလးကေတာ့ မိမိတို႔ Blog တစ္ခုဖြင့္လုိက္ျပီ ဆုိတာနဲ႔ မျဖစ္မေနပါလာတတ္တဲ့ Prowered by Blogger ဆုိတဲ့စာတမ္းေလးကို ဖ်က္နည္းပါ ဒီစာတမ္းေလးကေတာ့ မိမိ မလိုခ်င္ေပမယ့္ ပံုမွန္ Gadget ေတြကိုဖ်က္သလို ဖ်က္လုိ႔မရပါဘူး ဘာေၾကာင့္လည္းဆိုေတာ့ သူကိုဖြင့္လုိက္တာနဲ႔ Remove ဆုိတဲ့ဖ်က္တဲ့ေနရာ မပါလုိ႔ပါပဲ မိမိ မလုိခ်င္ေပမယ့္ Blog မွာေတြကပ္ေနပါတယ္ အဆိုးဆံုးျဖစ္တာကေတာ့ Templates ေတြကို ႏွစ္ခါ သံုးခါေလာက္ေျပာင္းလိုက္တဲ့အခါ Labels ေတြၾကားမွာ ေရြ႔မရ ျပဳမရ ျဖစ္ေနတတ္ပါတယ္ ဒါဆုိဒီစာတမ္းေလးက မိမိတုိ႔ရဲ႕ Blog မွာအျမင္ကပ္ စရာၾကီးျဖစ္ေနပါတယ္ ဒါကိုဖ်က္နည္းမသိေသးေသာ Blogger မိတ္ေဆြမ်ားအတြက္ ဒီပို႔စ္ေလးကို ေရးသားလိုက္ပါတယ္ Blogger ဆရာၾကီးေတြ အတြက္ေတာ့ မရည္ရြယ္ပါ တက္သစ္စ Blogger သစ္ေလးမ်ားအတြက္ပါ ဖ်က္နည္းအမ်ဳိးမ်ဳိး ရိွတဲ့အထဲက အလြယ္ကူဆံုး နည္းလမ္းေလးနဲ႔ မိတ္ဆက္ေပးလုိက္ပါတယ္ Prowered by Blogger စာတမ္းေလးကို ဖ်က္မယ္ဆုိရင္........

(၁) မိမိတုိ႔ Blog ကို Sign in ဝင္လုိက္ပါ

(၂) Template ကိုသြားပါ

(၃) Edit HTML မွာႏွိပ္ပါ

ေအာက္ကပံုေလးအဆင့္ကိုေရာက္ရင္ေတာ့ Box ထဲမွာ တစ္ခ်က္ႏွိပ္ျပီး Ctrl+F ကိုတြဲႏွိပ္လိုက္ပါ ျပီးရင္ ေပၚလာတဲ့ Box ေလးထဲမွာ Attribution1 လို႔ရိုက္ထည့္ျပီး Enter ေခါက္လိုက္ပါ ျပီးရင္ ေအာက္က ပံုေလးမွာ အနီေရာင္နဲ႔ ဝိုင္းျပထားတဲ့ေနရာေတြကို ဖ်က္လို္က္ပါ ျပီးေတာ့ အခုနားကအေပၚညာဖက္ေထာင့္နားေလးမွာ ေရးခဲ့တဲ့ Attribution1 Box ေလးကိုဖ်က္လိုက္ပါ ျပီးရင္ Save template မွာႏွိပ္ျပီး View Blog ကိုႏွိပ္ျပီးဝင္ၾကည့္လုိက္ပါ Powered by Blogger ဆုိတဲ့ စာတမ္းေလးေပ်ာက္သြားတာ ေတြ႔ရပါလိမ့္မယ္ အားလံုးအဆင္ေျပပါေစ..........


Video ဖိုင္ေလးနဲ႔ ၾကည့္ခ်င္ရင္ေတာ့ ေအာက္မွာထပ္ၾကည့္လိုက္ပါ.....


Thursday, September 11, 2014

Free Blogger Account လုပ္နည္း


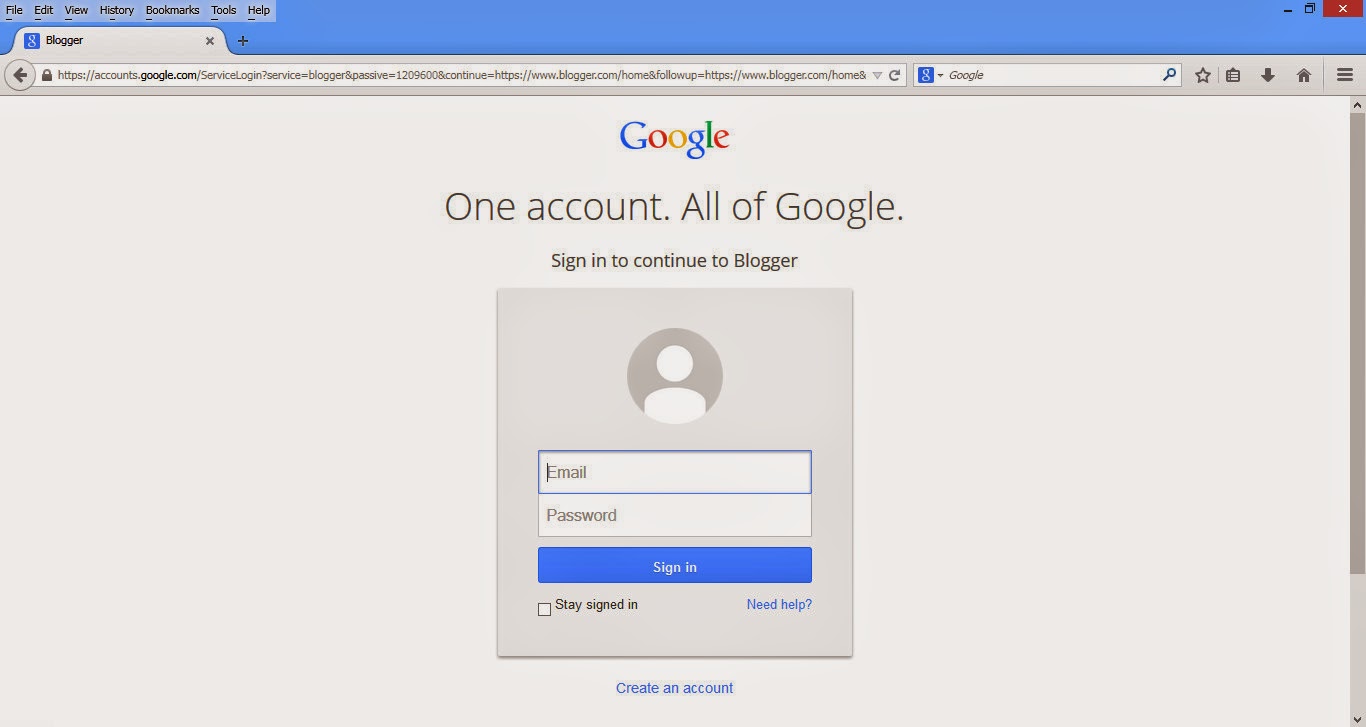
အားလံုးမဂၤလာပါ မိမိကိုယ္ပိုင္ Free Blogger တစ္ခုထူေထာင္လုိသူမ်ားအတြက္ အေျခခံ Blog ဖြင့္နည္းေလးကိုေရးသားလုိက္ပါတယ္ ရည္ရြယ္ခ်က္ကေတာ့ ျမန္မာ Blogger မ်ားတုိးပြါးေရးကို ေမွ်ာ္မွန္းျပီး ေရးသားျခင္းျဖစ္ပါတယ္ ေနာက္တစ္ခ်က္ကေတာ့ ခဏခဏ လာေမးျပီး မၾကာခဏ ဆုိသလို အကူညီေတာင္းျပီး Blog ဖြင့္ခုိင္းေနၾကတဲ့ ဝါသနာတူ ညီငယ္ ညီမငယ္ ေဘာ္ဒါ မိတ္ေဆြ သူငယ္ခ်င္းမ်ားအတြက္ ကိုယ္တုိင္လုပ္တတ္ေအာင္လုိ႔ ဒီပုိ႔စ္ေလးနဲ႔ ရွင္းျပလုိက္ပါတယ္ Blog တစ္ခုျပဳလုပ္မယ္ဆုိရင္ ပထမဦးစြာ မိမိမွာ Gmail Accoung တစ္ခုရိွဖုိ႔လုိပါတယ္ Gmail Account လုပ္နည္းကိုေတာ့ ဒီေနရာမွာ မရွင္းျပေတာ့ပါဘူး Gmail အေကာင့္လုပ္နည္း မသိေသးပါက ဒီေနရာမွာ  ႏွိပ္ျပီးေလ့လာလုိက္ပါ ကဲ့ Gmail ရိွျပီဆုိရင္ေတာ့ ကၽြန္ေတာ္တို႔ Free Blogger Account လုပ္နည္းေလး စရေအာင္ Google ကေနျပီး www.blogger.com ကိုသြားပါ ျပီးရင္ Sign in ဝင္လိုက္ပါ ေအာက္ကပံုအတုိင္းျဖစ္ခ်င္ရင္ေတာ့ http://www.google.co.uk/ ကိုသြားပါ  

အင္တာနက္မရိွရင္လည္း ၾကည့္လုိ႔ရေအာင္ စာအုပ္အျဖစ္ ယူခ်င္တယ္ဆုိရင္ေတာ့ ေအာက္မွာေဒါင္းယူပါ

                                                                 ဒီမွာယူပါ==>>DOWNLOAD
(ပံု-၁)
(ပံု-၂) ဒီအဆင့္မွာေတာ့ Gmail နဲ႔ Password ကိုမွန္ကန္စြာ ရိုက္ထည့္ျပီး Sign in ဝင္လုိက္ပါ
(ပံု-၃) ဒီေနရာမွာေတာ့ ဒီေနရာမွာေတာ့ ပံုမွာျမွားျပထားတဲ့အတုိင္း New Blog မွာႏွိပ္ပါ
(ပံု-၄) ဒီေနရာမွာေတာ့ Title ေနရာမွာ မိမိၾကိဳက္ႏွစ္သက္တဲ့ ဘာသာ Language ကိုထည့္ႏိူင္ပါတယ္ Address ေနရာမွာေတာ့ အဂၤလိပ္လိုသာရိုက္ထည့္လို႔ရပါမယ္ Address မွာရိုက္ထည့္လိုက္တဲ့ စာလံုးေလးေတြဟာ မိမိျပဳလုပ္မယ့္ Blog Link ပါပဲ တစ္ခု သတိထားရမွာကေတာ့ Address မွာရိုက္ထည့္ေနစဥ္ သူရဲ႕ ညာဖက္ေဘးနားေလးမွာ အမွတ္ေလး တစ္ခု ေပၚလာပါလိမ့္မယ္ အဝါေရာင္ ေပၚေနရင္ေတာ့ မရပါ အျပာေရာင္ေပၚတဲ့အထိ နာမည္ေပးရပါမယ္  ျပီးရင္ေတာ့ Template မွာၾကိဳက္ႏွစ္သက္ရာ ပံုတစ္ပံုကိုေရြးပါ ျပီးရင္ Create blog! မွာႏွိပ္ပါ
(ပံု-၅) ဒါေလးကေတာ့ အေပၚကအဆင့္ပါပဲ စာဖတ္သူ နားလည္ရင္ေတာ့ ေက်ာ္သြားလုိက္ပါ နားမလည္ေသးရင္ေတာ့ ေအာက္ကပံုထပ္ၾကည့္ပါ (1) Title ေနရာမွာ (ၾကည္လြင္ နည္းပညာ) လုိ႔ေပးလုိက္ပါတယ္ (2) Address ေနရာမွာ kyilwin လုိ႔ေပးတာကုိ သူကလက္မခံလို႔ (kyilwin8) လုိ႔ေပးလိုက္ပါတယ္ ဒါကေတာ့ ၾကည္လြင္ဆိုတဲ့ ညီငယ္ေလး တစ္ေယာက္က ဖြင့္ခုိင္းတာမုိ႔ပါ စာဖတ္သူလည္း မိမိစိတ္ၾကိဳက္ နာမည္ကိုထည့္ႏိူင္ပါတယ္ (3) အမွတ္ကေလးဟာ ပံုမွာအတုိင္း အျပာေရာင္ေပၚေနရင္ သူကခြင့္ျပဳပါတယ္ (4) Template ေနရာမွာ မိမိႏွစ္သက္ရာ ပံုတစ္ပံုကိုေရြးယူပါ (5) Create blog! မွာႏွိပ္လုိက္ပါ
(ပံု-၆) ဒီေနရာမွာေတာ့ Blog တစ္ခုကို ပိုင္ဆုိင္ပါျပီ မိမိတုိ႔ျပဳလုပ္လိုက္တဲ့ Blog စာမ်က္ႏွာကို သြားၾကည့္ခ်င္တယ္ဆုိရင္ေတာ့ View blog ေလးမွာႏွိပ္ျပီးၾကည့္ႏိူင္ပါတယ္
(ပံု-၇) ဒါကေတာ့ မိမိျပဳလုပ္လုိက္တဲ့ Blog စာမ်က္ႏွာပါပဲ အေျခခံ Blog ဖြင့္နည္းေလးကေတာ့ ဒီေနရာမွာ ျပီးဆံုးပါျပီ ( Blogger Template ထည့္နည္း ၊ ပို႔စ္တင္နည္း ၊ HTML ေတြကို ေနာက္ဆက္တြဲေလ့လာပါ

ေပ်ာ္ရႊင္စရာ ေန႔ေလးတစ္ေန႔ျဖစ္ပါေစ နည္းပညာ လမ္းေၾကာင္းေပၚက ဝါသနာတူ သူငယ္ခ်င္း မိတ္ေဆြ ေဘာ္ဒါမ်ားအား ေလးစားစြာျဖင့္................